ENGLISH 10-0214
QUICK SETUP GUIDE
RF-CMBO 2.4GHz Wireless Combo
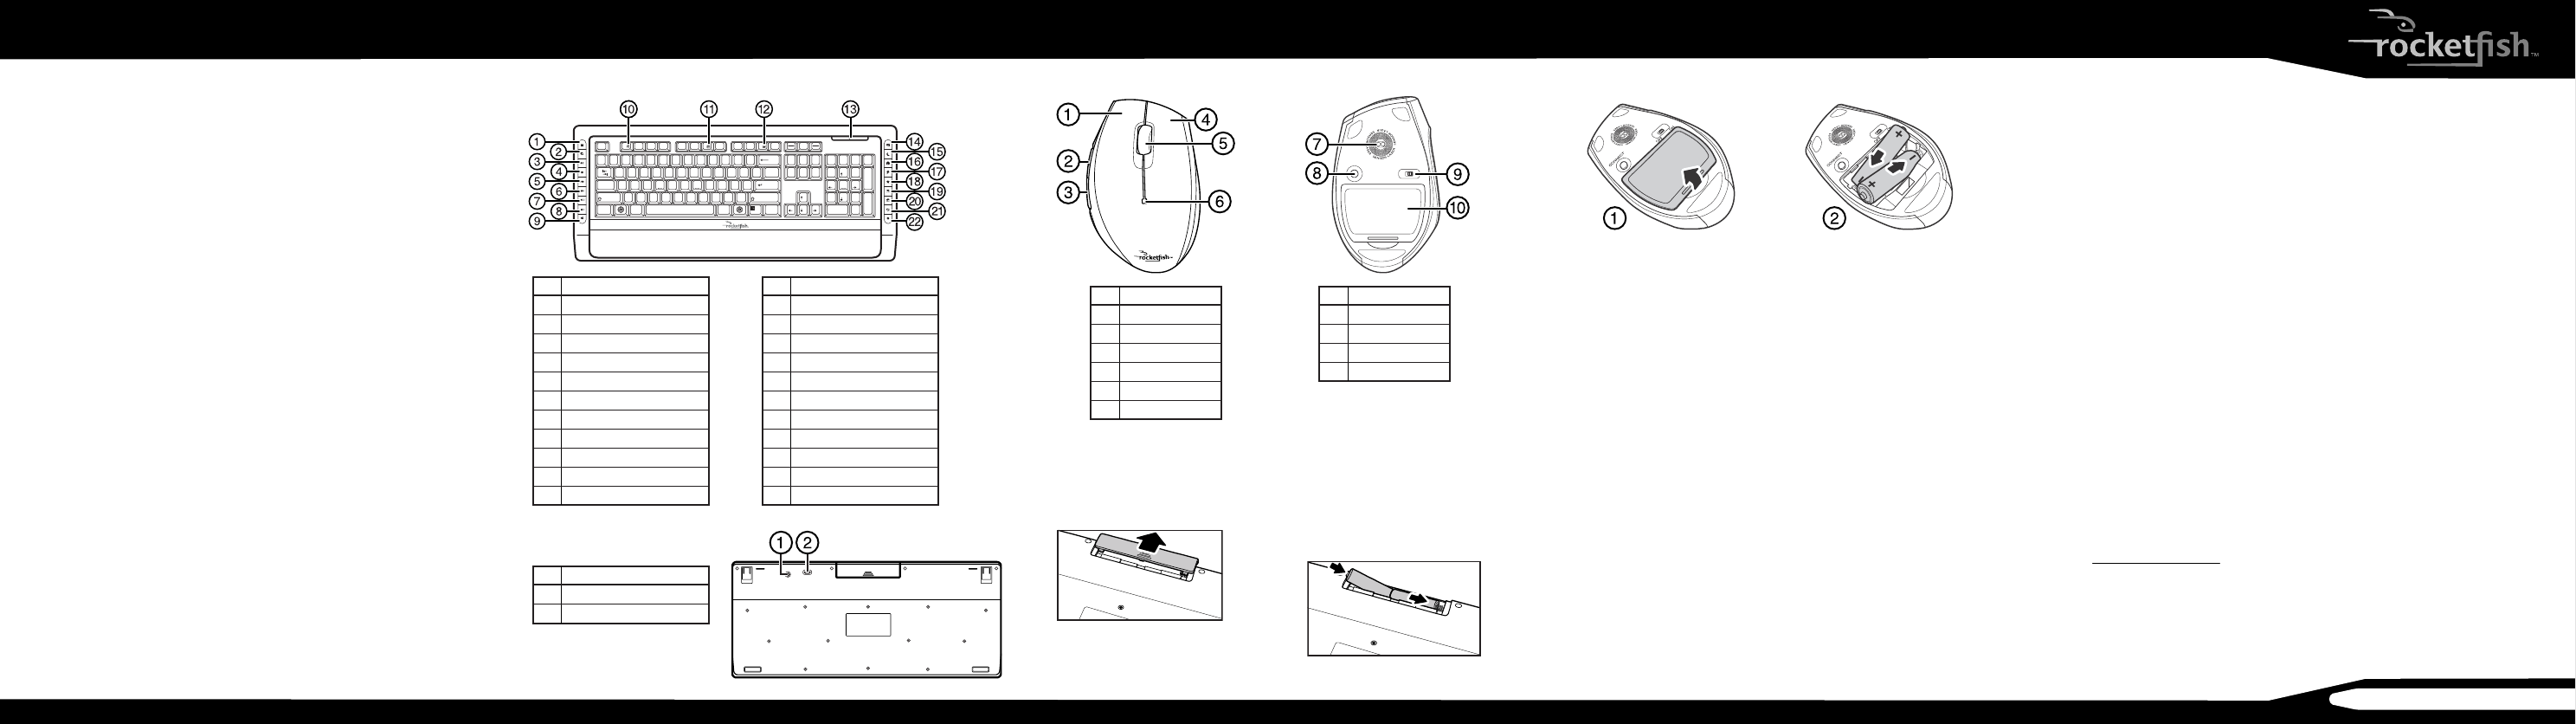
Mouse top Mouse bottom
Setting up
Installing the batteries
To install the keyboard batteries:
1 Remove the battery cover on the
bottom of the keyboard.
2 Install two AA batteries (included).
Make sure that the + and – symbols
on the batteries match the symbols
in the battery compartment.
3
Replace the battery cover.
Package contents
• Keyboard • Laser mouse
• 2.4G Receiver • AA batteries (4)
• Installation CD • Quick Setup Guide
including User Guide
Features
Keyboard
• 104-key design • 18 hot-keys
• Connect button • Power switch
• LED showing pairing • Soft palm rest
and battery status
Mouse
• Three mouse buttons (left, right, and middle)
• Tilt/scroll wheel
• Two hot-key buttons
• Power saving mode
• Excellent performance
• Working range up to 32.8 feet (10 meters)
• Dual-color status LED indicator
• Connect button
• Power switch
System requirements
• One available USB port (USB 2.0 or 1.1)
• Operating system: Microsoft® Windows® 7, Windows® Vista,
or Windows® XP with Service Pack 3 or higher
Keyboard bottom
CONNEC T
OFF ON
To install the mouse batteries:
1 Press the tab to release the battery cover on the bottom of the mouse.
2 Install two AA batteries (included). Make sure that the + and – symbols on the
batteries match the symbols in the battery compartment.
3 Replace the battery cover.
Setting up the keyboard and mouse
1 Plug the 2.4 GHz receiver into an available USB port on your computer.
2 Slide the power switch of the mouse to ON, to turn the mouse on.
3 Slide the power switch of the keyboard to ON, to turn the keyboard on. The
computer recognizes the keyboard and mouse automatically.
The keyboard and mouse are ready to use.
Installing the combo driver
To use advanced functions, such as tilt wheel driver, dynamic search and magnier,
you need to install the mouse driver and software.
1 Insert the installation CD (provided) in the CD drive on your computer. The
installation program should start automatically. If it does not start automatically,
open Windows Explorer, browse to the CD, then double-click autorun.exe.
The Rocketsh wireless combo screen opens.
2 Click Install Combo Driver. The Welcome screen opens.
3 Click Next. The Start installation screen opens.
4 Click Next. An installation progress bar appears.
When the installation is complete, the Setup Complete screen opens.
5 Click Finish.
Legal notices
FCC Part 15
This device complies with Part 15 of the FCC Rules. Operation of this product is subject to the following two
conditions: (1) this device may not cause harmful interference, and (2) this device must accept any interference
received, including interference that may cause undesired operation.
This equipment has been tested and found to comply within the limits for a class B digital device, pursuant to
Part 15 of the FCC Rules. These limits are designed to provide reasonable protection against harmful interference
in a residential installation. This equipment generates, uses, and can radiate radio frequency energy and, if not
installed and used in accordance with the instructions, may cause harmful interference to radio communications.
However, there is no guarantee that interference will not occur in a particular installation. If this equipment does
cause harmful interference to radio or television reception, which can be determined by turning the equipment
o and on, the user is encouraged to try to correct the interference by one or more of the following measures:
• Reorient or relocate the receiving antenna.
• Increase the separation between the equipment and receiver.
• Connect the equipment into an outlet on a circuit dierent from that to which the receiver is connected.
• Consult the dealer or an experienced radio/TV technician for help.
FCC warning
Changes or modications not expressly approved by the party responsible for compliance with the FCC Rules
could void the user’s authority to operate this equipment.
DHHS and FDA safety certication
This product is made and tested to meet safety standards of the FCC, requirements and compliance with safety
performance of the U.S. Department of Health and Human Services, and also with FDA Radiation Performance
Standards 21 CFR Subchapter J.
Canada ICES-003 statement
This Class B digital apparatus complies with Canadian ICES-003.
Cet appareil numérique de la classe (B) est conforme à la norme NMB-003 du Canada.
RSS 310 statement
To reduce potential radio interference to other users, the antenna type and its gain should be so chosen that the
equivalent isotropically radiated power (e.i.r.p.) is not more than that permitted for successful communication.
Operation is subject to the following two conditions: 1) this device may not cause interference and 2) this device
must accept any interference, including interference that may cause undesired operation of the device.
One-year limited warranty
Visit www.rocketshproducts.com for details.
© 2010 BBY Solutions, Inc., All Rights Reserved
Distributed by Best Buy Purchasing, LLC
7601 Penn Avenue South, Richeld, MN USA 55423-3645
CONNECT
OFF ON
Keyboard top
Esc F1 F2 F3 F4 F5 F6 F7 F8 F9 F10 F11 F12
Prt Scr
Screen
Insert
Backspace
Enter
Enter
AltCtrl
Caps Lock
Tab
lrtCtlA
Page
Up
Page
Down
+
=
_
-
-
-
)(
*
*
& ^%$#@!~
`
_
/
+
Delete
Scroll
End
Home
Home
798
End
1
1
0
23
4
5
6
7
8
9
PQ
{
[
{
[
\
/
WE R T Y U I O
A
:
;
"
'
SDFGHJKL
ZXCVB NM
<
,
.
>
?
Ins
0
Del
.
4
PgUp
3
PgDn
Num
Lock
65
2
Shift Shift
Pause
Break
Lock
# Description
1 Calculator button
2 Application switch button
3 Play/Pause button
4 Stop button
5 Previous track button
6 Next track button
7 Volume + button
8 Volume – button
9 Mute button
10 Help button
11 Spelling button
# Description
12 Slide show button
13 Status LED
14 E-mail button
15 Sleep button
16 Home button
17 Search button
18 My Favorite button
19 Back web page button
20 Forward web page button
21 Refresh web page button
22 Stop web page button
# Description
1 Connect button
2 Power switch
# Description
1 Left button
2 Forward button
3 Back button
4 Right button
5 Tilt/scroll button
6 LED indicator
# Description
7 Laser sensor
8 Connect button
9 Power button
10 Battery cover
 Manymanuals.com
 Manymanuals.de
 Manymanuals.fr
 Manymanuals.it
 Manymanuals.pl
 Manymanuals.cz
 Manymanuals.es
 Manymanuals-pt.com
Comments to this Manuals